We've been handing more and more work to Agents running on our office machines. But as the number of Agents grew, two problems started to surface:
- When you're away from the computer, how do you reach that machine in the office?
- With multiple machines, multiple projects, and multiple Agents running at once, how do you manage them all?
This post walks through our setup: use Tailscale to build a private LAN you can reach from anywhere, then use Orca to pull all your Agents into a single panel.
Part 1: Building a Private LAN with Tailscale
First, the network. Tailscale's core idea is simple: pull your devices — home computer, phone, office machine — into one virtual LAN so they can talk to each other as if they were on the same local network.
Setup is straightforward:
- Sign up at tailscale.com
- Install the Tailscale client on your computer and log in
- Install Tailscale on your phone
There are three ways to set up the phone side. Pick the one that fits your situation.
The Official Tailscale Client
Download the official client from the iOS App Store and log in. This is the easiest option, but there's one catch: if you run other proxy tools on your phone, Tailscale will hijack the proxy port and break them. If your phone's network setup is clean, this is the most hassle-free choice.
Using Shadowrocket
If you already use Shadowrocket (小火箭) or a similar tool, you can fold Tailscale into it and avoid the port conflict.
First, generate an auth key in the Tailscale admin console:
- Open console.tailscale.com/admin/settings/keys
- Click Generate auth key
- We recommend checking Reusable (required if multiple devices share the same key), then copy the generated key
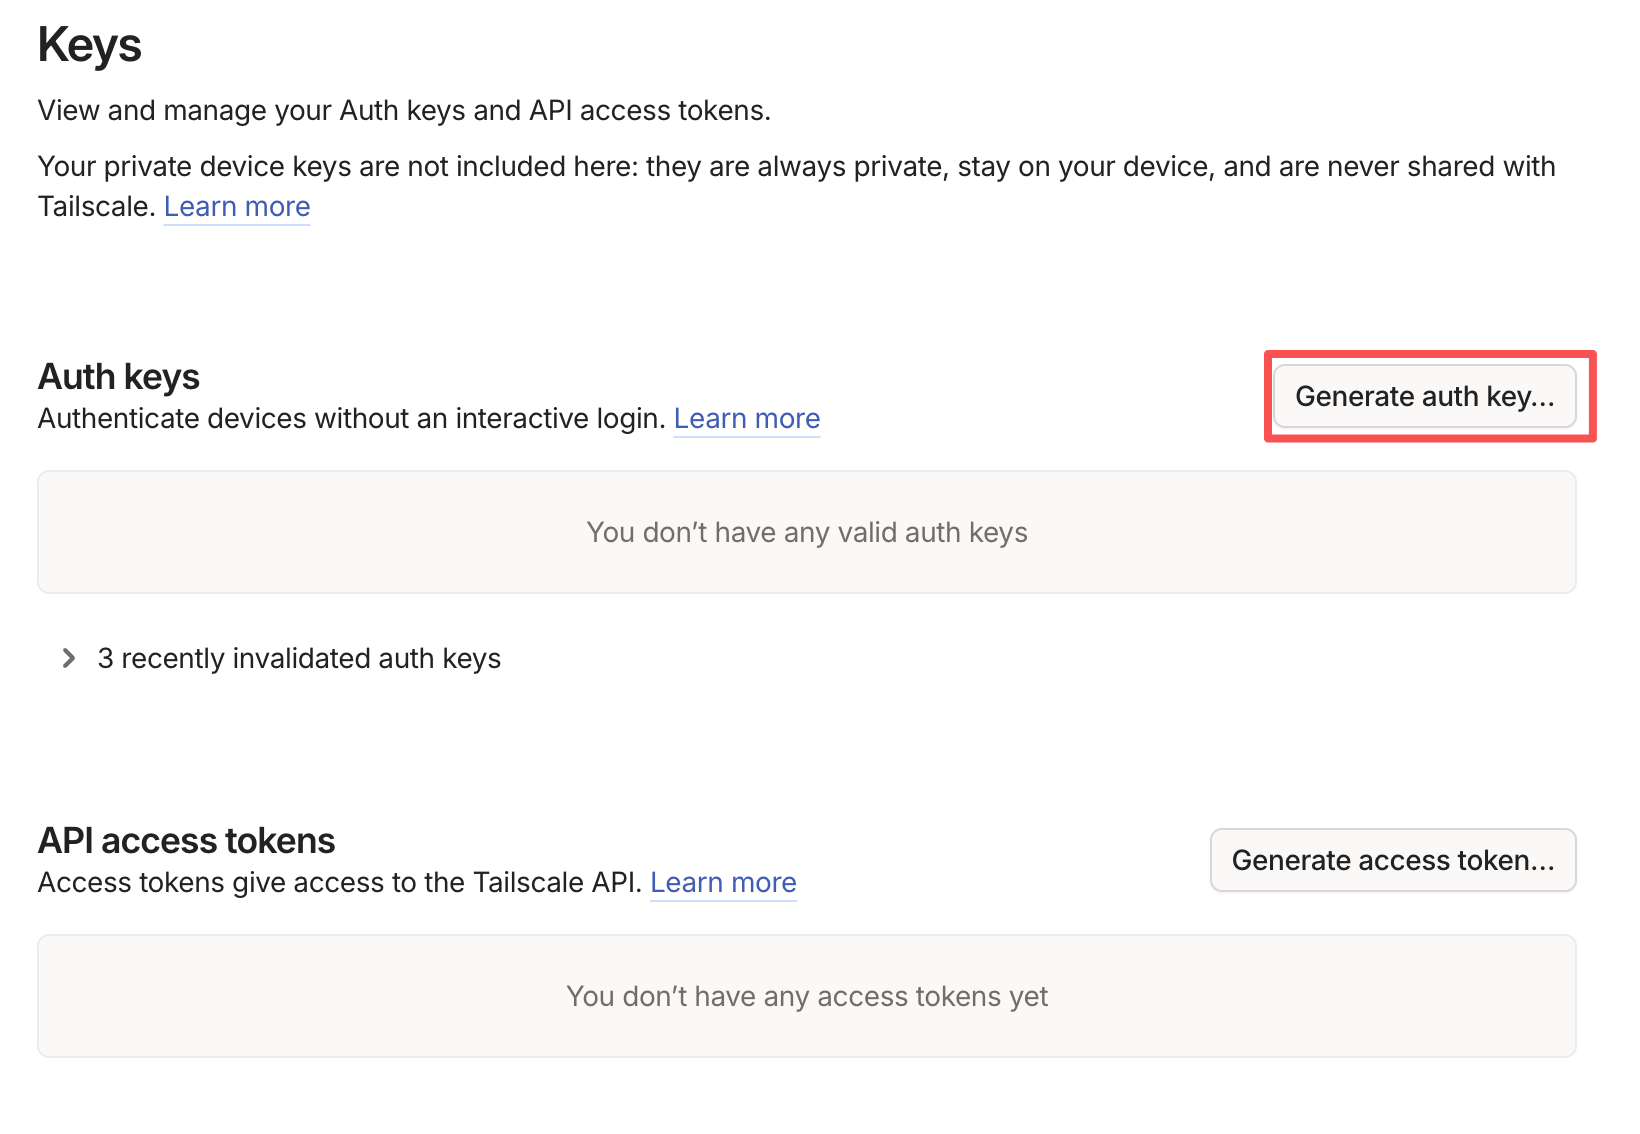
Then open Shadowrocket, tap Settings at the bottom, select Tailscale, and paste in the auth key to finish setup.
Using Stash
Stash also supports Tailscale natively. You can add a Tailscale node directly as a proxy of type: tailscale in your config:
proxies:
  - name: ts-main
    type: tailscale
    auth-key: tskey-auth-xxxxxxxxxxxxxxxx
Or configure it through the GUI: Home → Proxy Info → tap the plus icon in the top right → select Tailscale as the proxy type, then fill in the auth key and other details.
Once the config takes effect, Tailscale is just a regular proxy node. Traffic only goes through it if your rules point it there:
rules:
  - DOMAIN-SUFFIX,ts.net,ts-main
  - IP-CIDR,100.64.0.0/10,ts-main,no-resolve
You can do the same via the GUI: Home → Config → Rules → tap the plus icon in the top right → fill in the rules as above.
With this in place, when your phone accesses a device on the Tailscale network (say, your home computer), the traffic goes to this node — and your other local proxies are unaffected.
A few things to watch out for:
- If your phone still can't reach the computer, go to Settings → Tunnel → Bypass Route (跳过路由), delete the
100.64.0.0/10entry, and restart the proxy. - Auth keys are subject to Key Expiry. In the Machines page of the Tailscale admin console, set this device to Expiry disabled — otherwise the node will automatically go offline when the key expires.
- To reuse one auth key across multiple devices, check Reusable when generating it. A one-off key is invalidated after a single use.
Once configured, your phone can reach your home computer as if they were on the same LAN. This is the network foundation for everything remote that follows.
Part 2: Managing All Your Agents with Orca
With the network sorted, the next question is: how do you efficiently manage Agents running everywhere?
Whether it's juggling multiple terminals or multiple VS Code windows, finding the right project and directing the right Agent was getting tedious. We found Orca, an Agent IDE (officially "the worktree IDE for AI coding agents") that runs Claude Code, Codex, OpenCode, OMP, and other agent software, and manages their status in one place. It has 40k+ stars on GitHub, is MIT-licensed open source, and is built by a YC-backed team.
We had three requirements for Orca:
- Control Agents running on our computers from a phone
- Batch-manage multiple Agents across different folders
- Visual scheduled-task configuration for recurring work
Orca nails all three.
Installing Orca
Orca supports macOS, Windows, and Linux. Download it from the official site:
- macOS: separate builds for Apple Silicon and Intel
- Windows: installer
- Linux: AppImage or .deb
Older versions are available on the GitHub Releases page.
On macOS you can also use Homebrew — the official cask follows every stable release:
brew install --cask stablyai/orca/orca
Upgrade later with brew upgrade --cask orca. Note that the cask tracks the stable channel — for RC builds, download from GitHub Releases or use in-app updates.
First Launch
The first time you open Orca, it will:
- Request permission to access your home directory, used for adding repositories.
- Offer to import your config if it detects
~/.claude,~/.codex, or a Ghostty terminal setup. - Land on an empty start page, where you add your first repository.
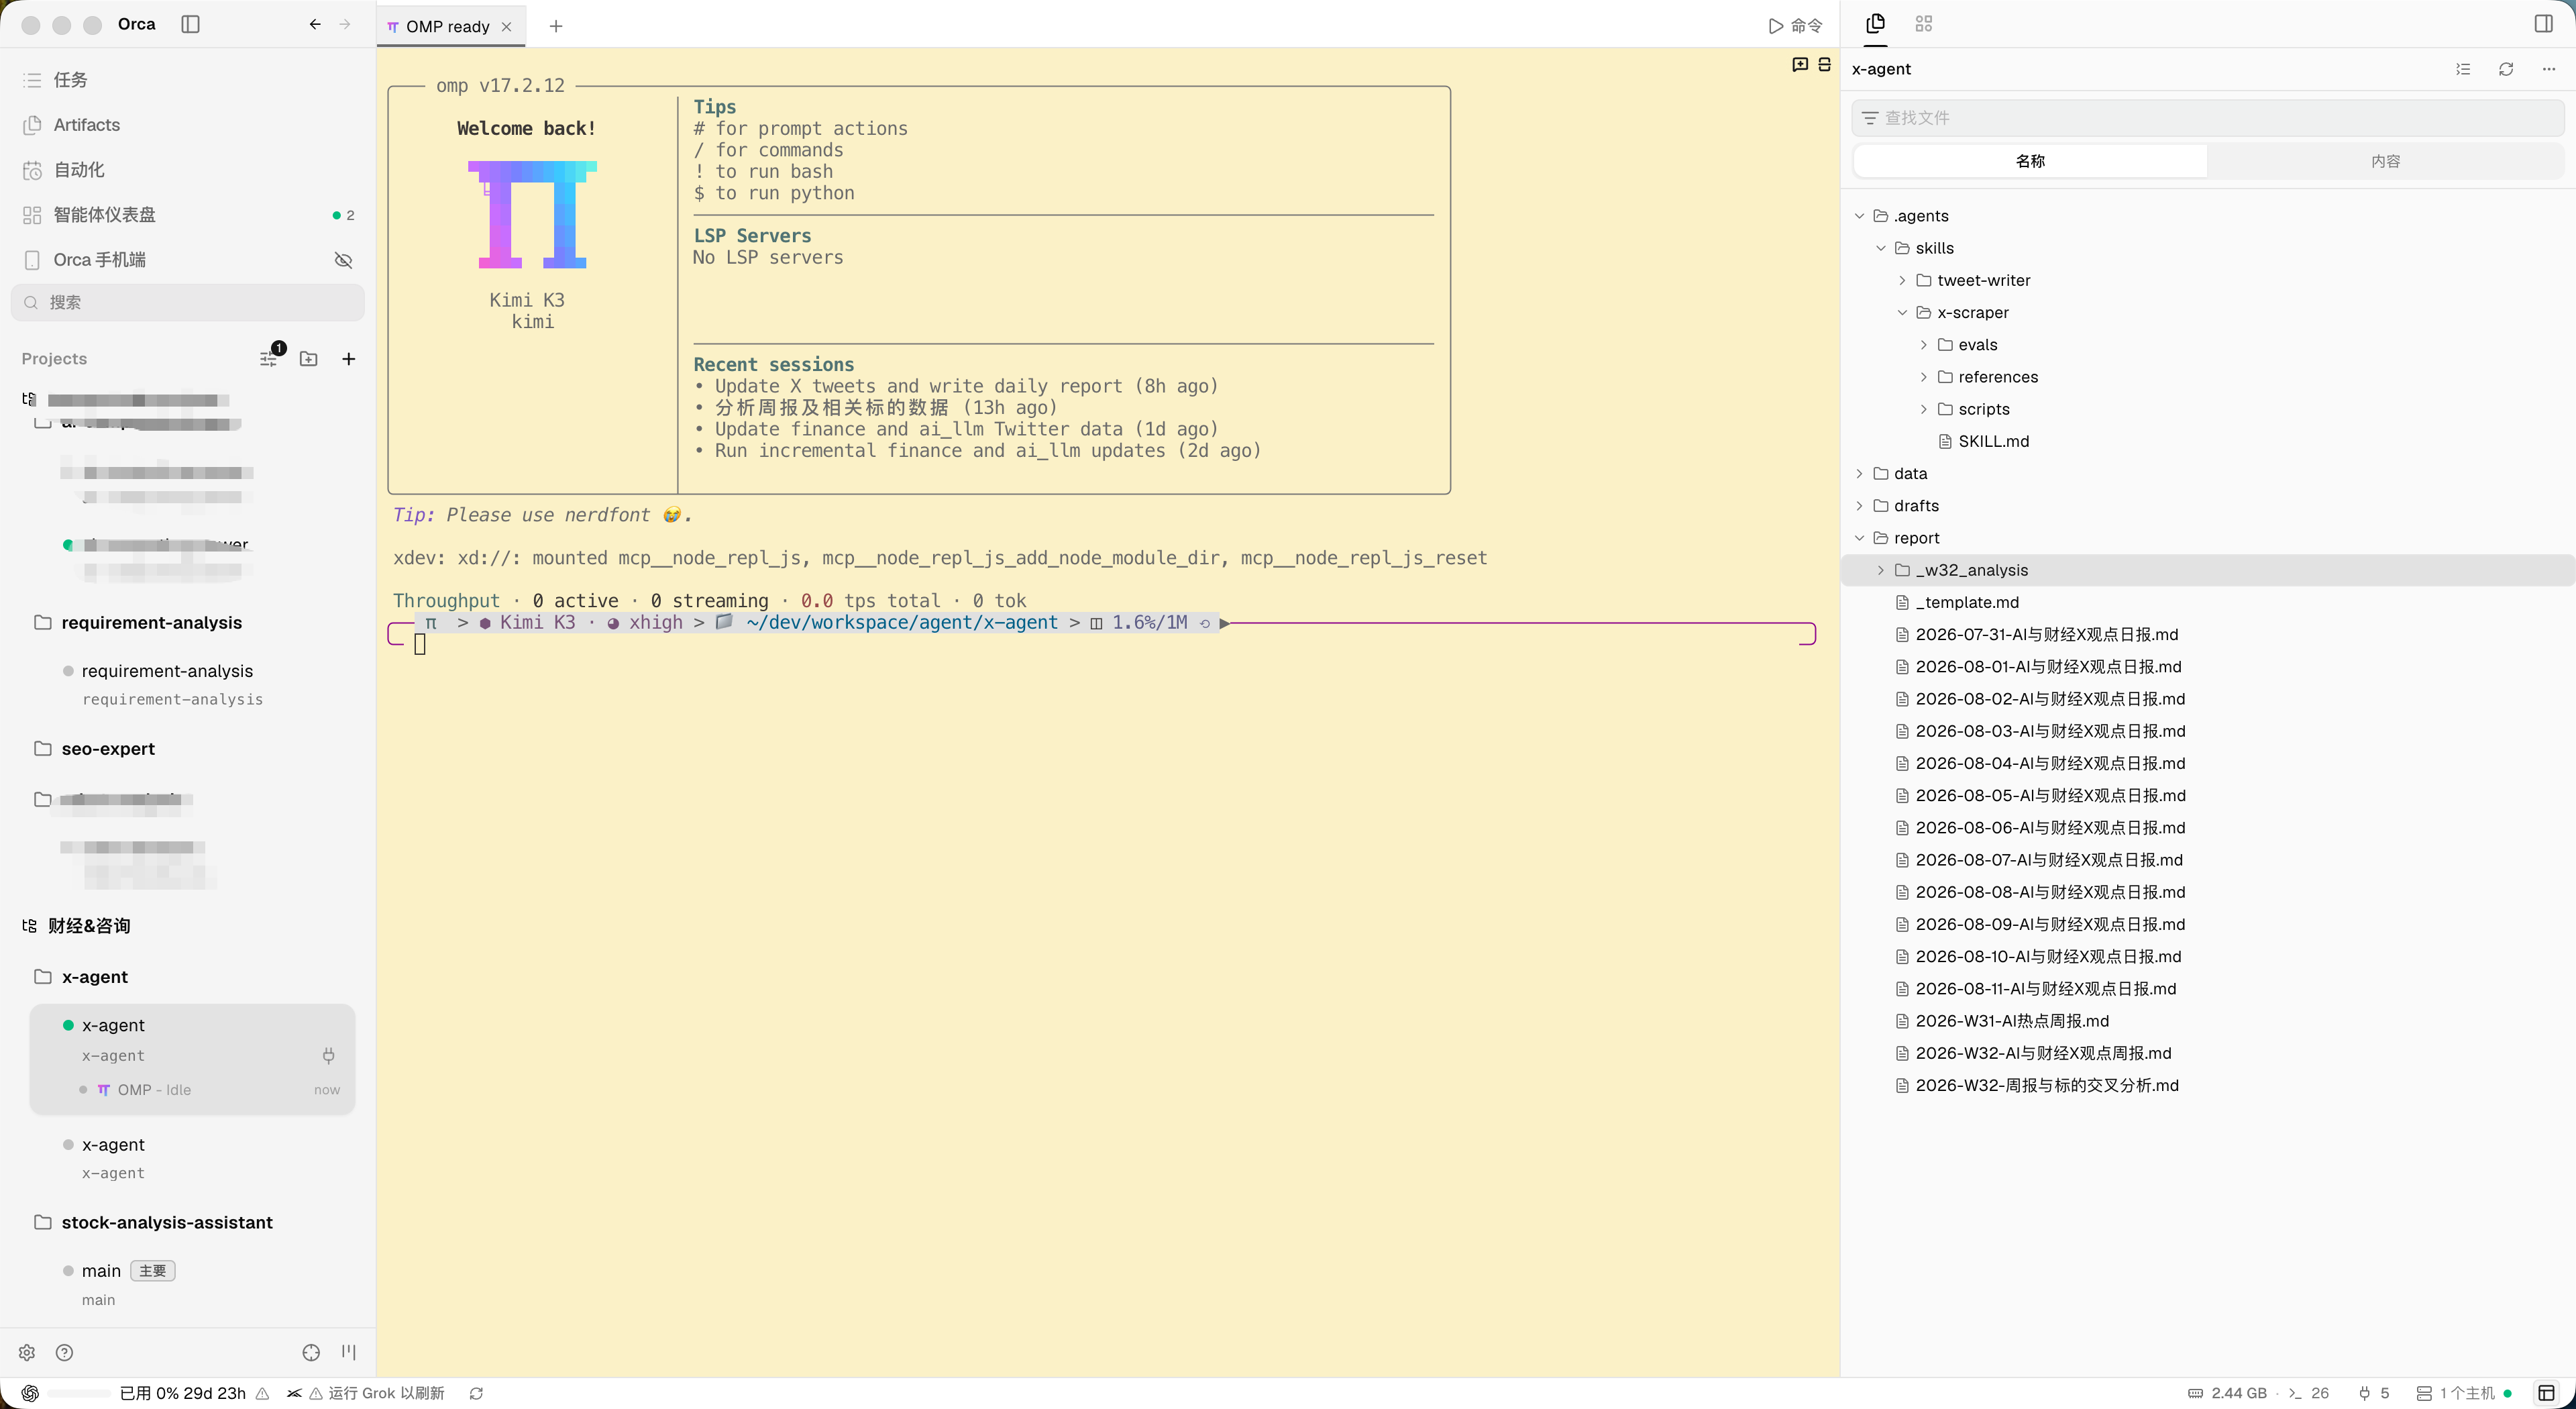
Controlling Your Computer's Agents from Your Phone
This feature works better than expected — driving your computer's Agents from a phone feels remarkably smooth.
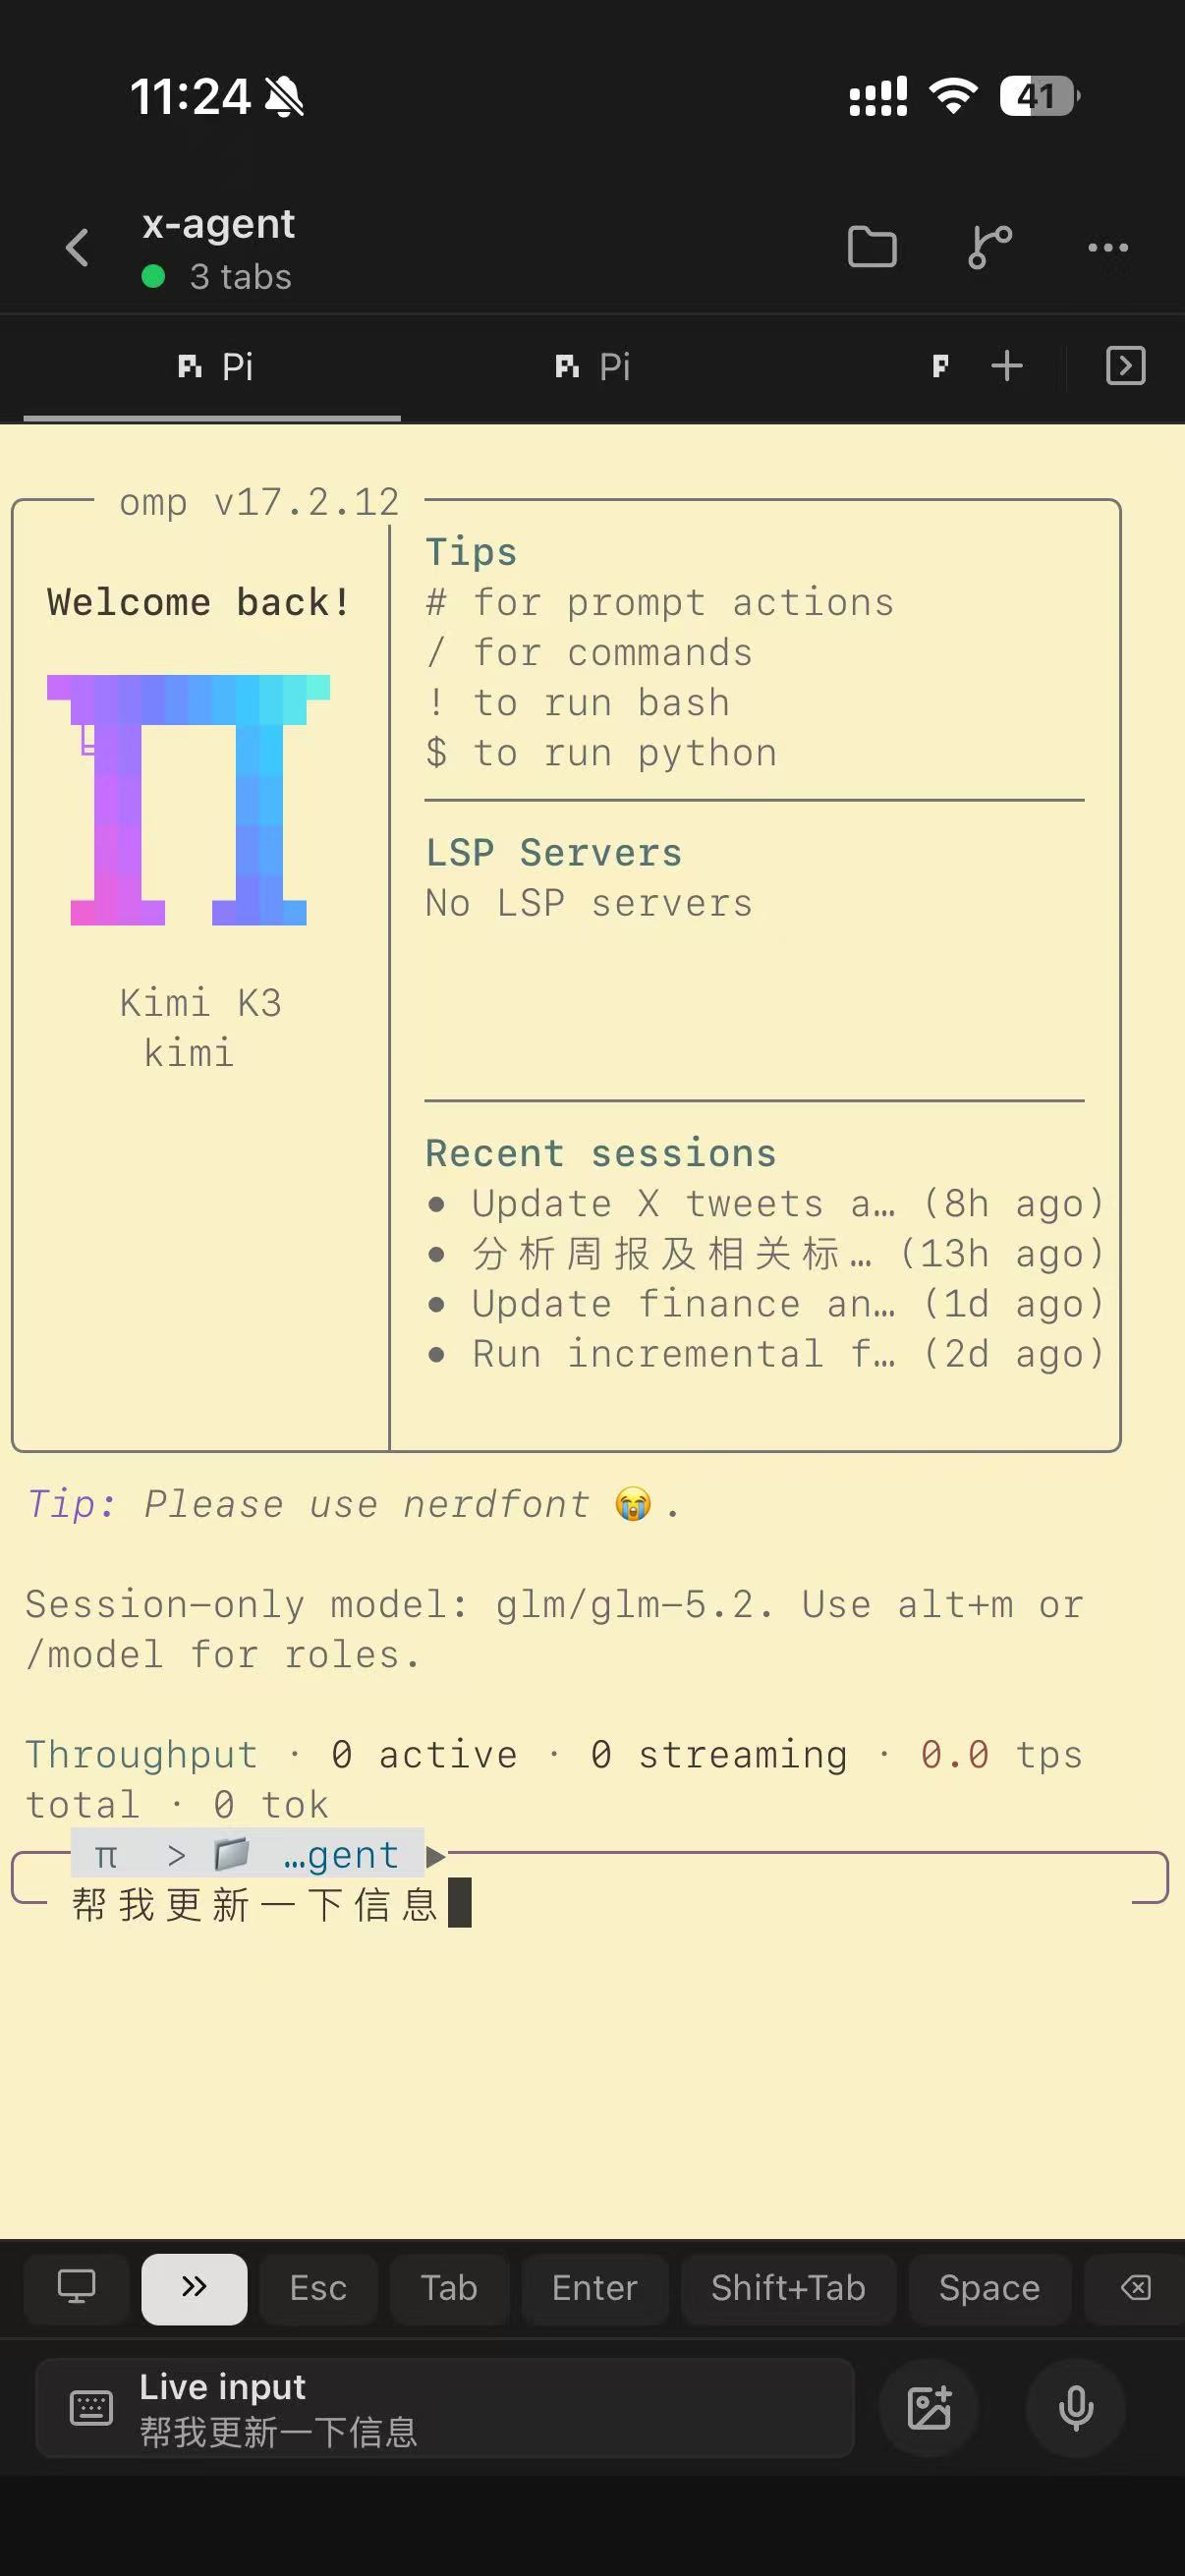
First, download Orca on mobile:
- iOS (US region): App Store
- Android: GitHub Releases
Pairing is simple: after installing Orca on your computer, select the Orca mobile option in the left sidebar to open the pairing flow and generate a one-time pairing code. Enter it on your phone (or scan the QR code in the app). The only prerequisite is network connectivity between phone and computer — same LAN, or the Tailscale network you set up earlier.
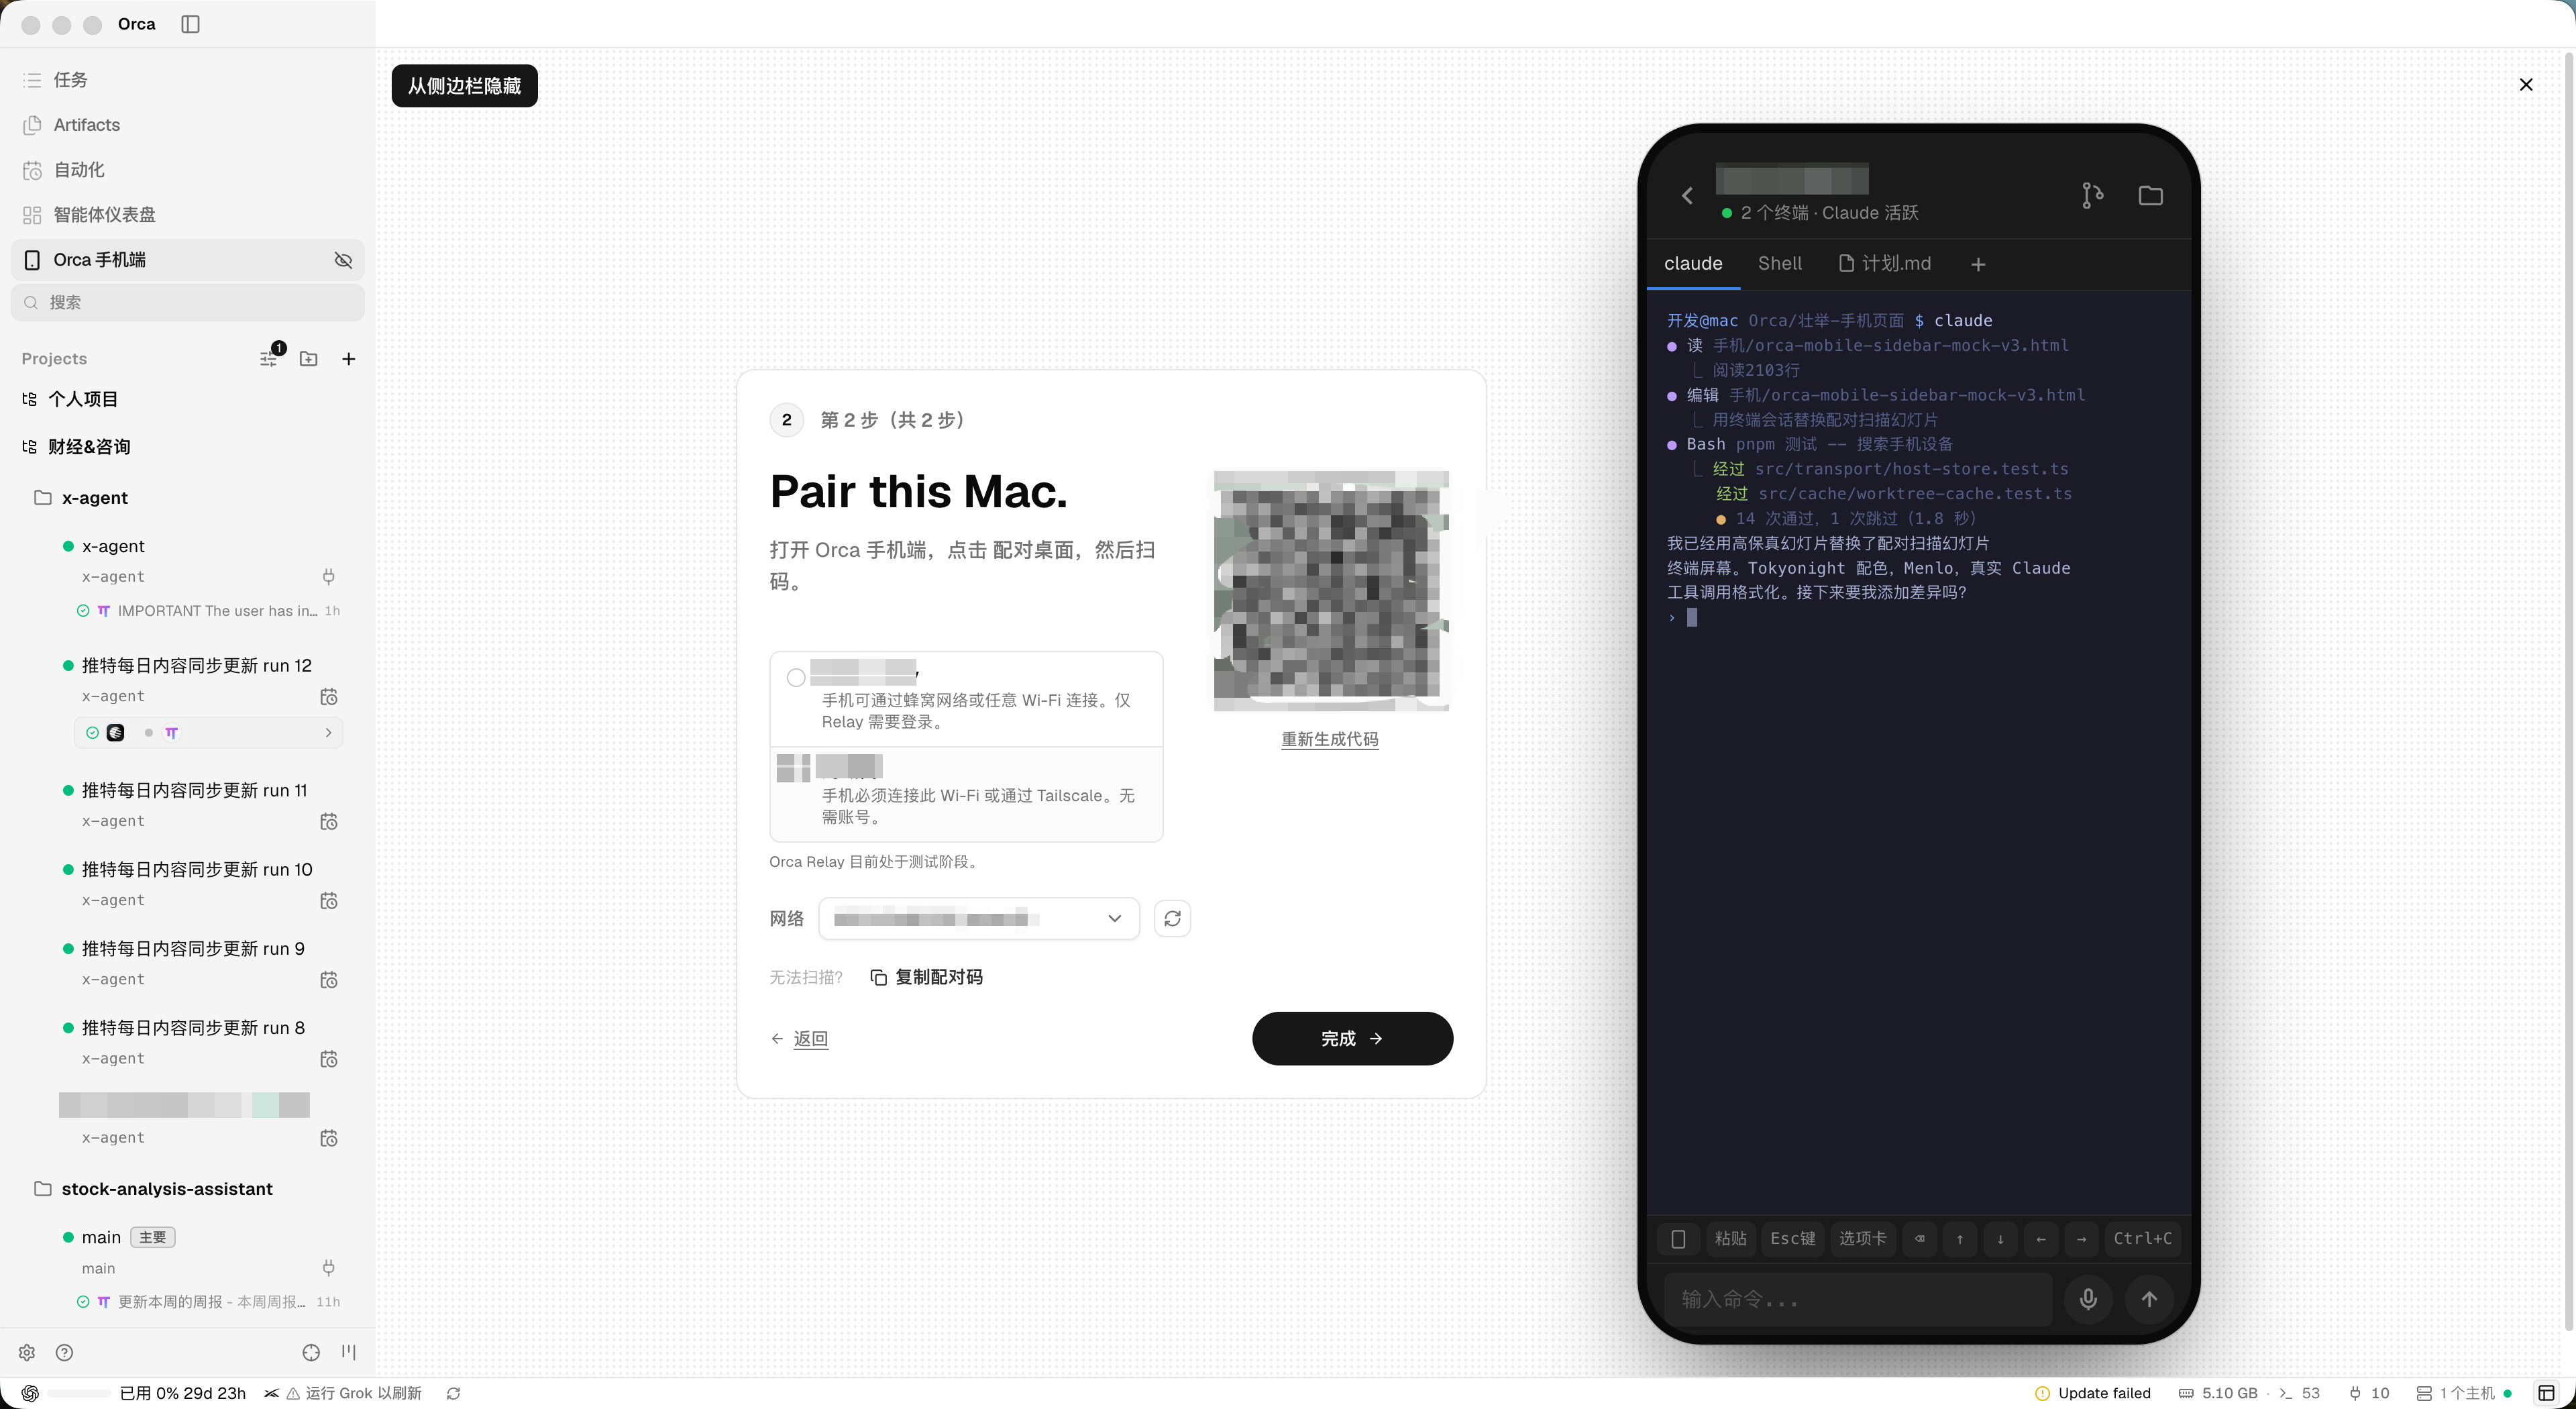
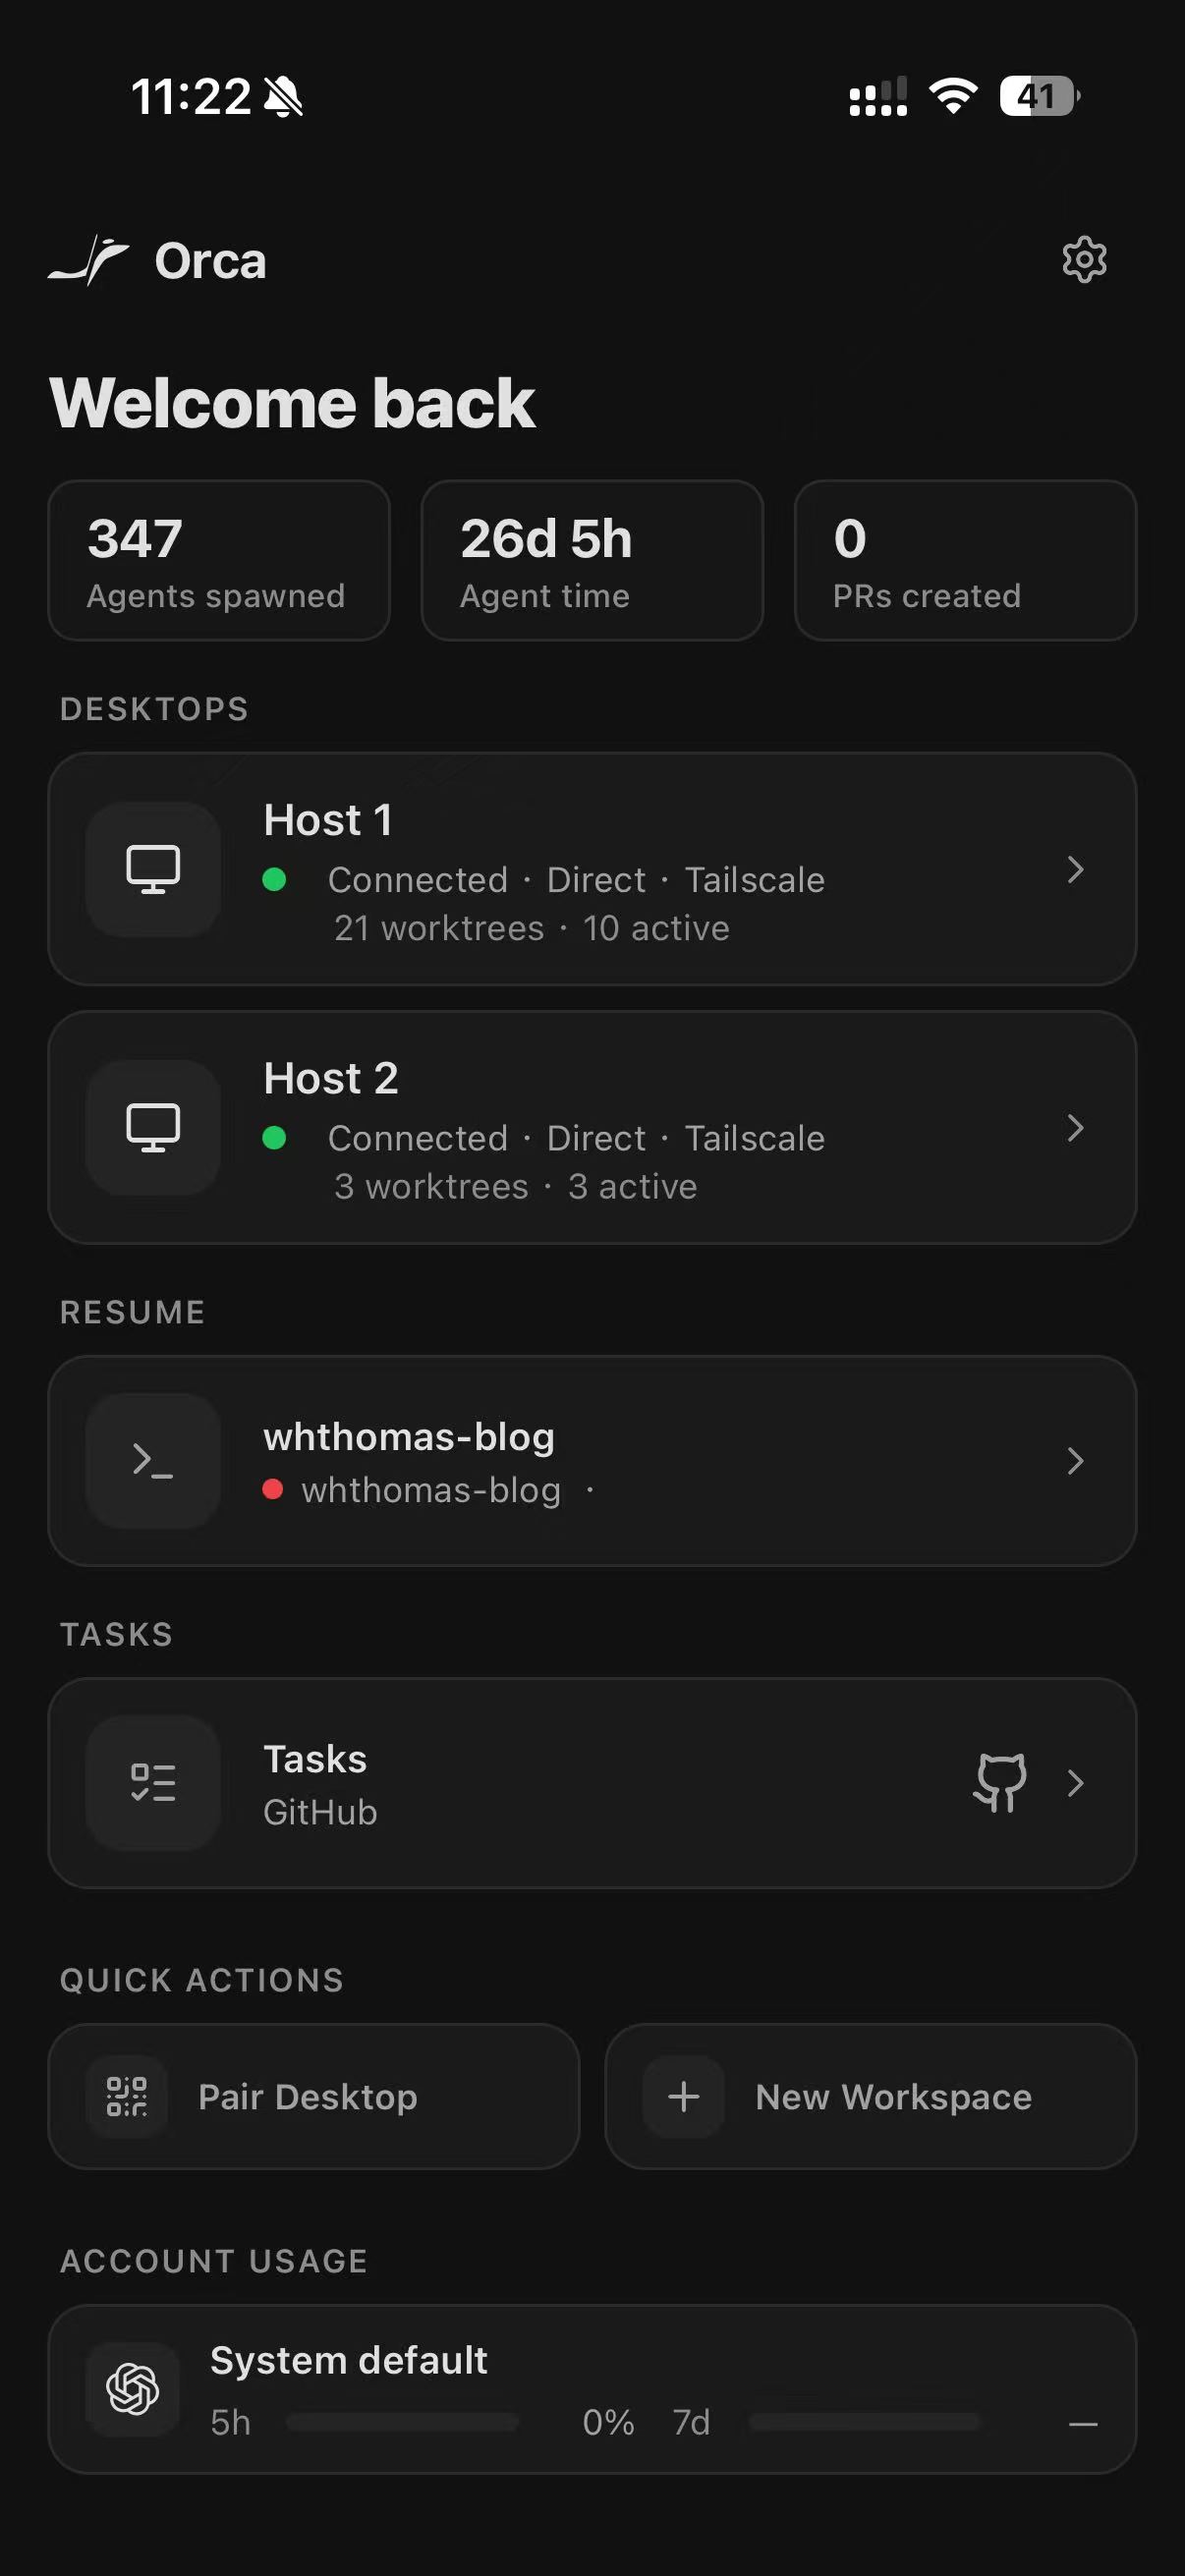
Once paired, you can run your computer's Agents from your phone. What you get:
- See the status of every worktree and Agent (working / done / waiting for input), with multiple hosts merged into a single view.
- Scroll through terminal history to see what an Agent did and what it's asking.
- When an Agent waits for confirmation, reply "continue", "yes", or any free-form text — voice input and images work too.
- Get push notifications when Agents finish.
- Lightweight source control: review changes, stage, and commit — wrap up small fixes right from your phone.
- Create new workspaces directly from the phone, with task sources from GitHub, Linear, and GitLab.
The official positioning of the mobile app is clear: it's not a full editor — it's a remote control for the desktop app.
Managing Multiple Agents, Folders, and Machines
As Agent usage grew, we accumulated a lot of Agent working directories, and managing them through terminals or editors became a real chore. Orca happens to solve exactly this.
Orca automatically detects the agent software installed on your computer (Claude Code, Codex, OMP, Kimi Code, and more):
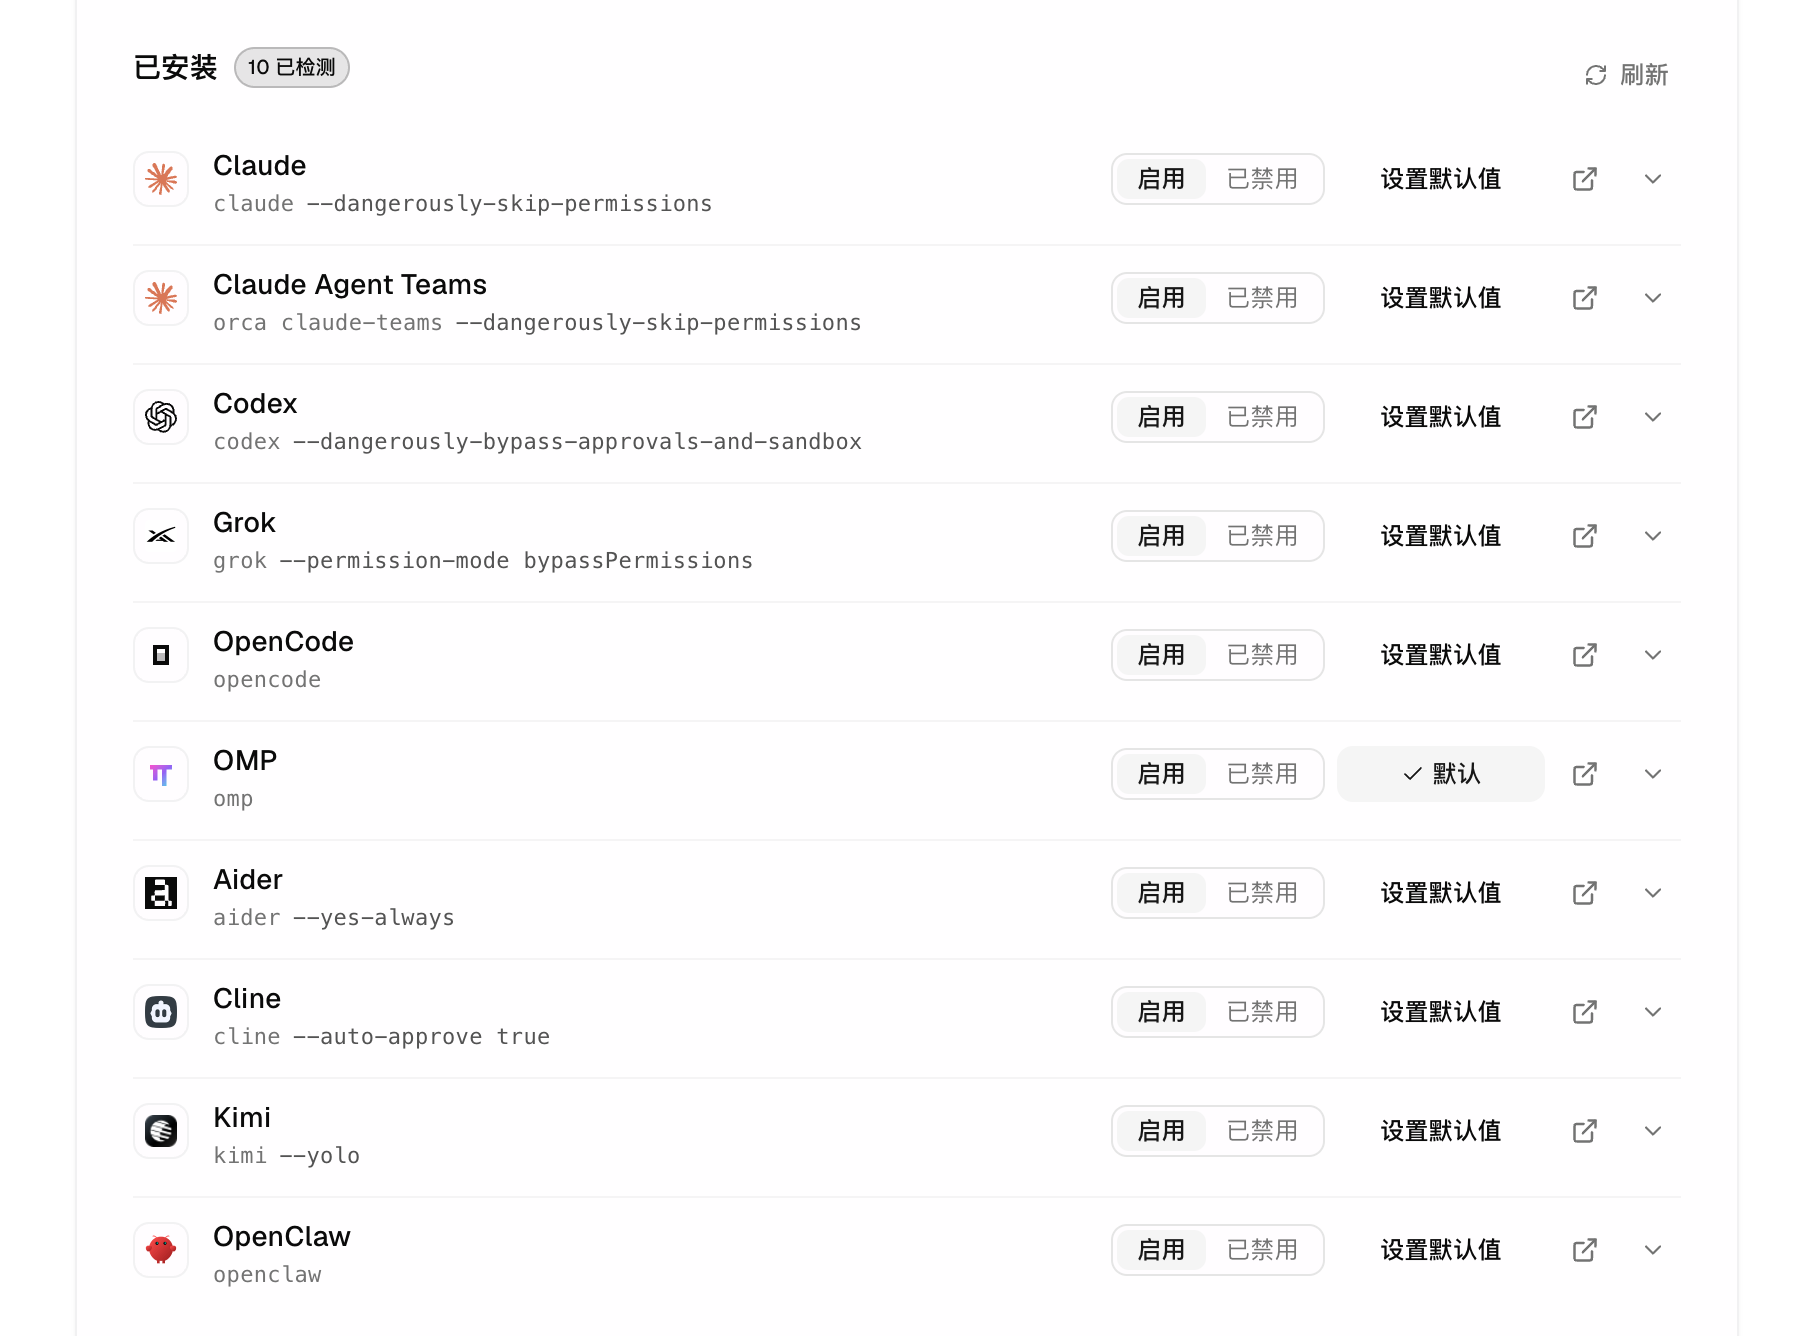
Orca also supports importing multiple Agent working directories. You can:
- Group by project: one project maps to one git repository (or one folder), with all of its worktrees underneath. Pin the ones you use often; filter out the ones you don't want to see.
- Multi-repo project groups: add a parent folder containing multiple git repositories to Orca and group them into a project group. You can even create "folder workspaces" at the group level, binding the task source to a specific repo in the group.
- Beyond your local machine: when creating a worktree, choose "Run on" to run the task on another machine.
The docs list four execution modes:
| Mode | Where files and Agents run | Best for |
|---|---|---|
| Local | Your own computer | Day-to-day development, fast iteration |
| SSH target | A remote host you connect to over SSH | A beefier machine at home/office, or a GPU host |
| Remote Orca Server | An always-on machine running Orca | Agents keep running when your laptop lid closes; your phone connects anytime |
| Cloud VM | A disposable cloud sandbox per worktree | Task-level isolation, destroyed after use |
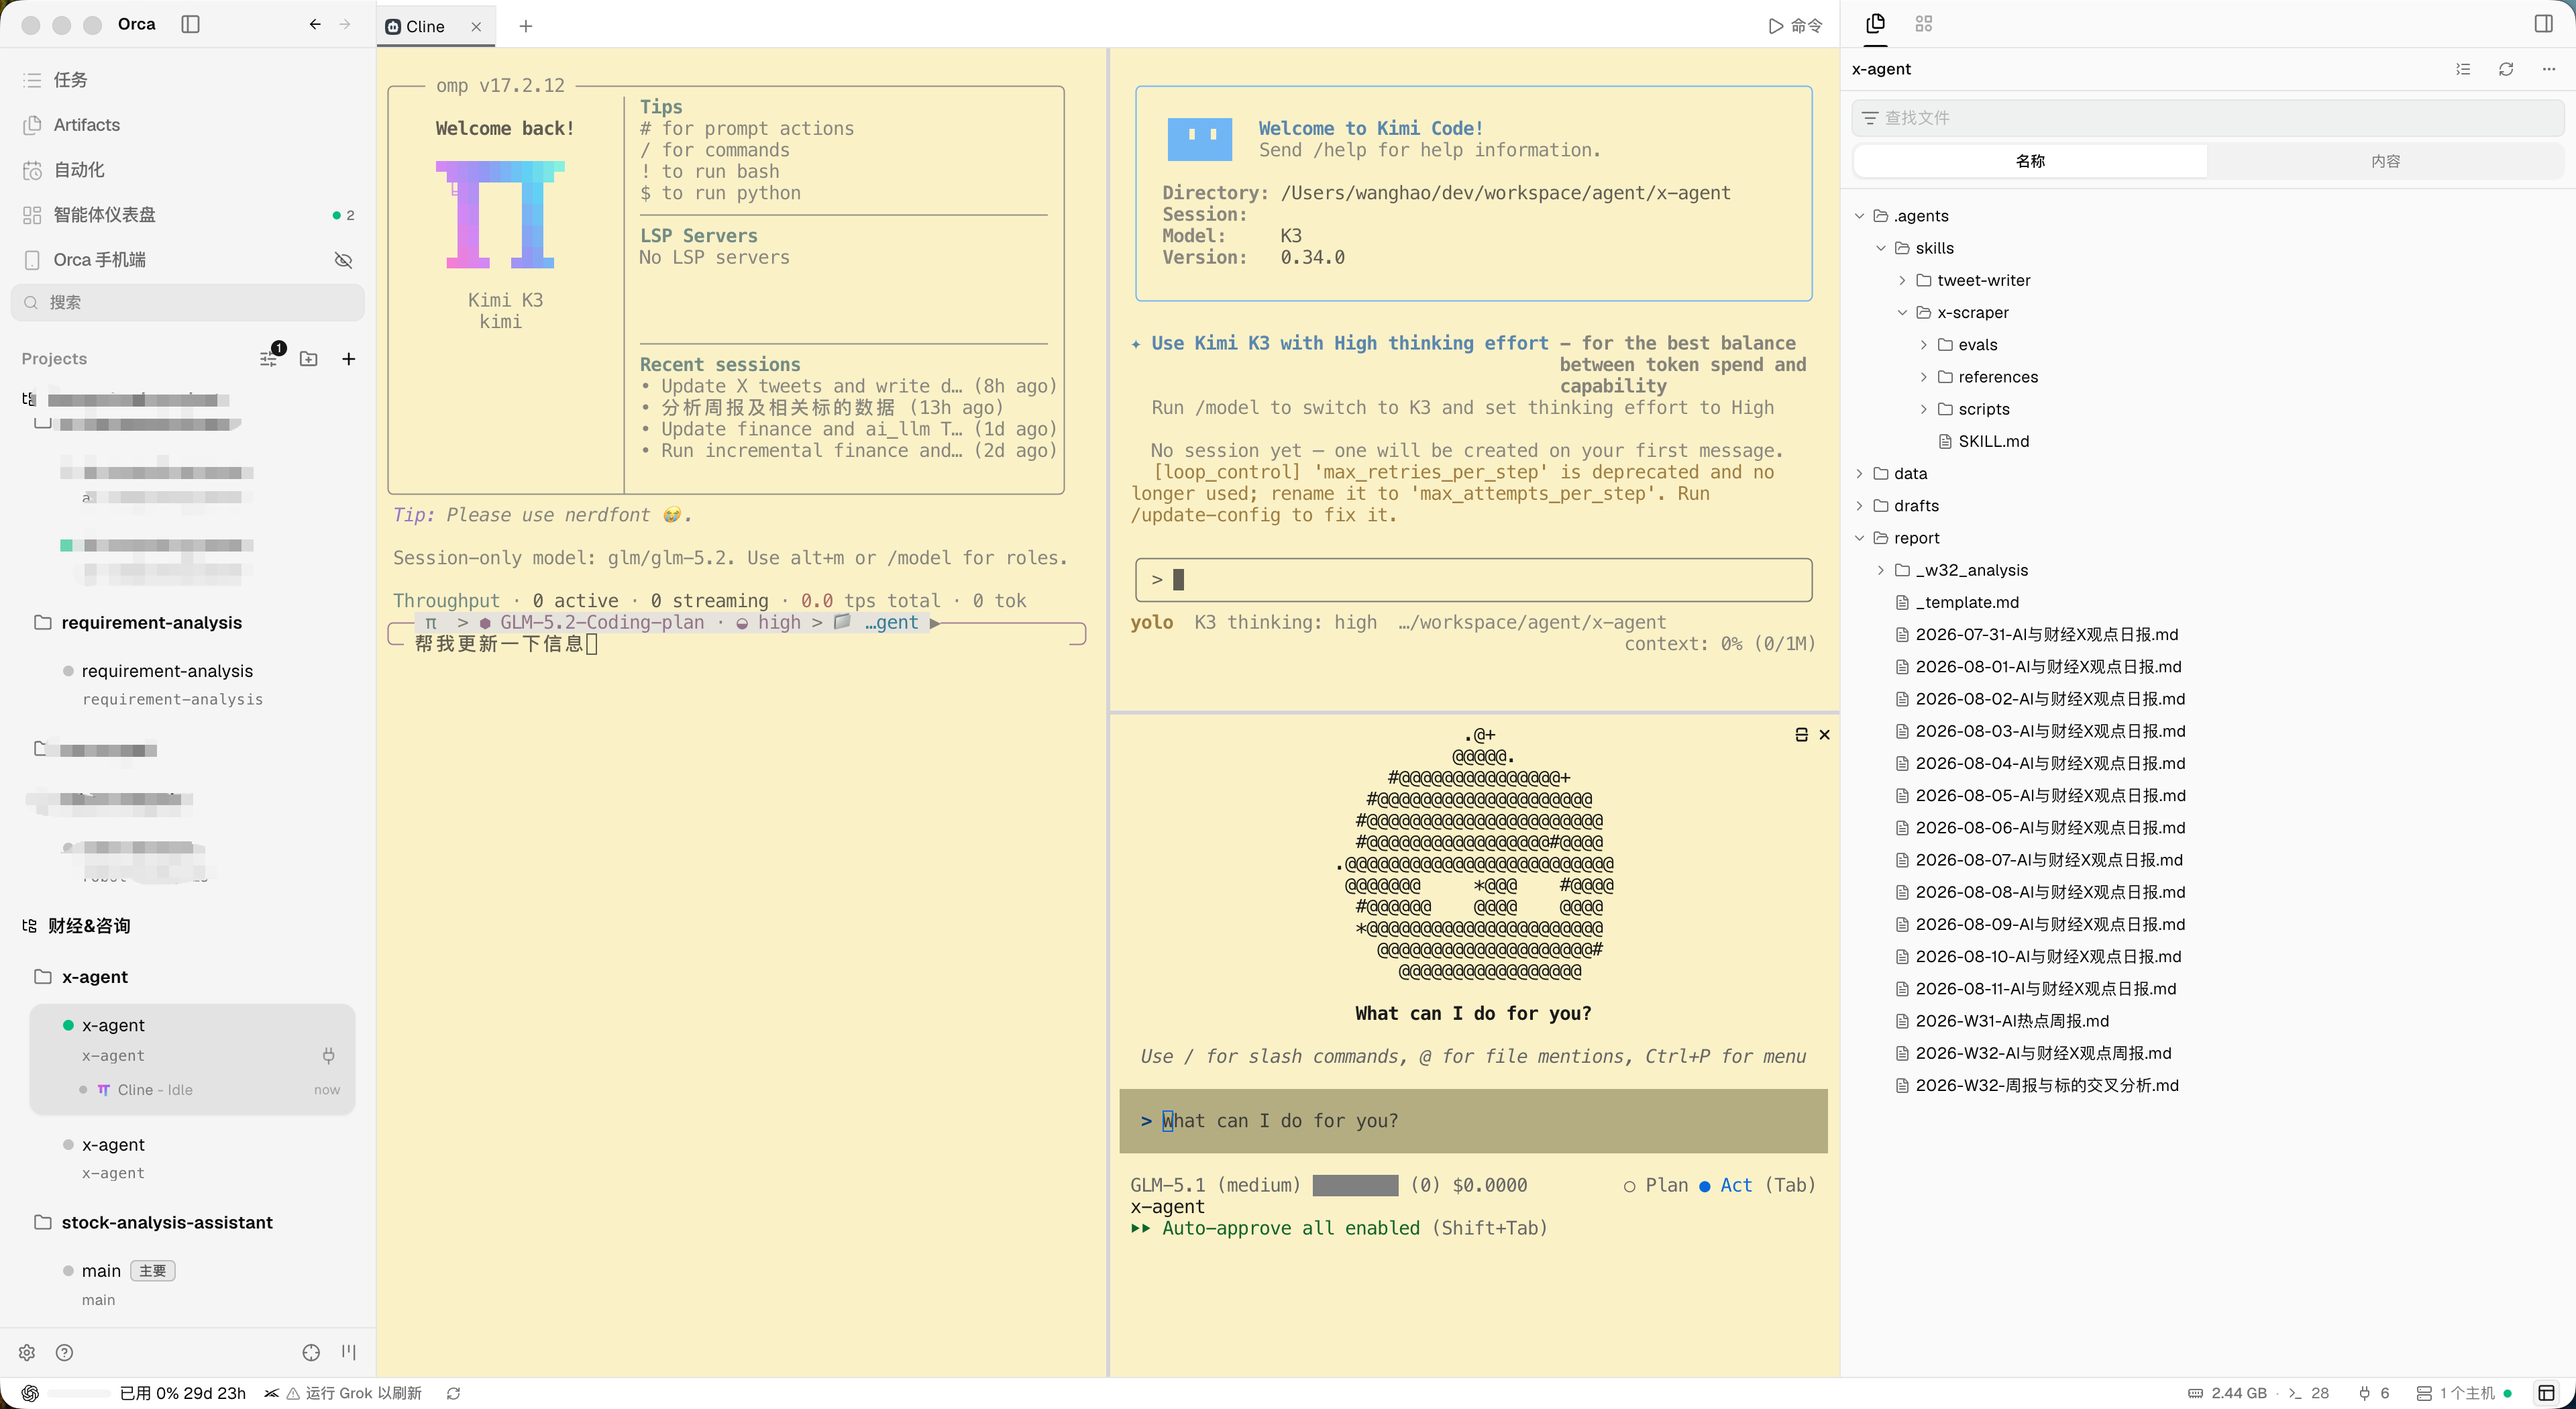
Our setup is a simplified version of the third mode: Orca runs always-on on the home computer, combined with the Tailscale setup from Part 1 so we can take over from anywhere. Configuration-wise, you generate an access link on the server and paste it into the client — no need for the orca serve command-line approach.
Scheduled Tasks
Scheduled tasks handle recurring work: at the scheduled time, an Agent is automatically dispatched to do the job. The feature lives in Orca's left sidebar.
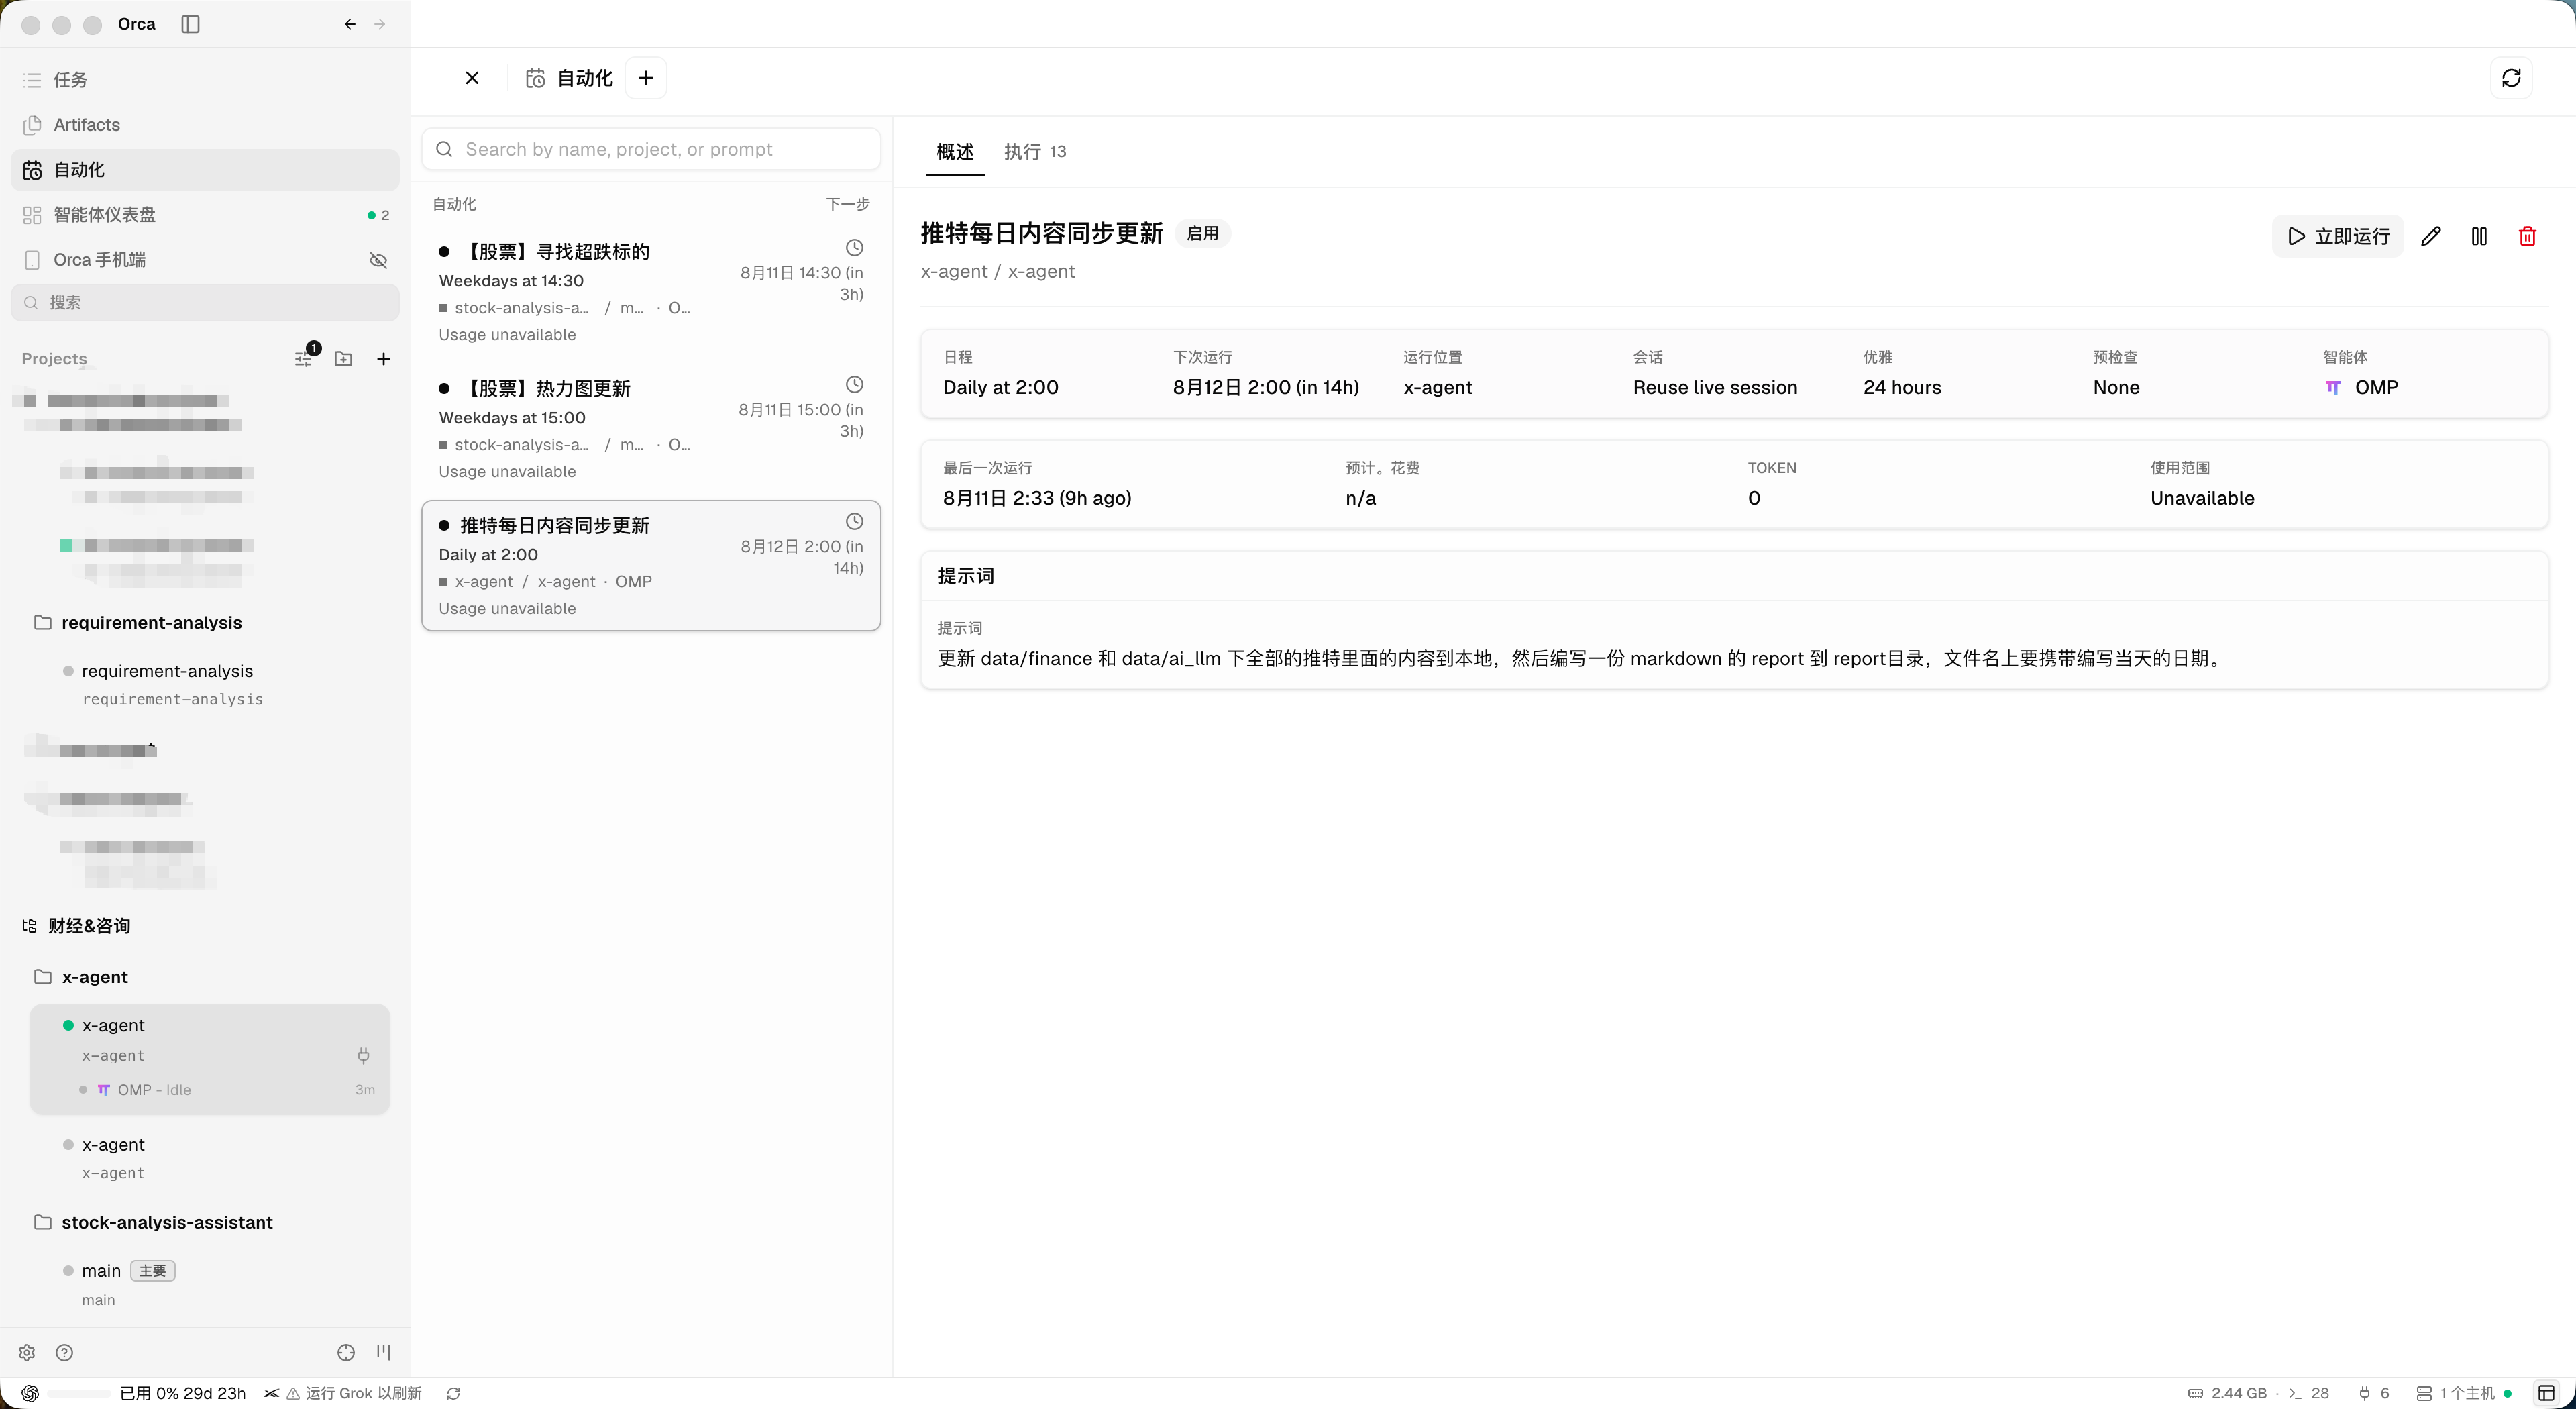
The list page shows each task's schedule and next run time. The detail page shows:
- Last run time
- Token usage
- Total run count
There's a "Run now" button in the top right to trigger a run manually — handy for debugging.
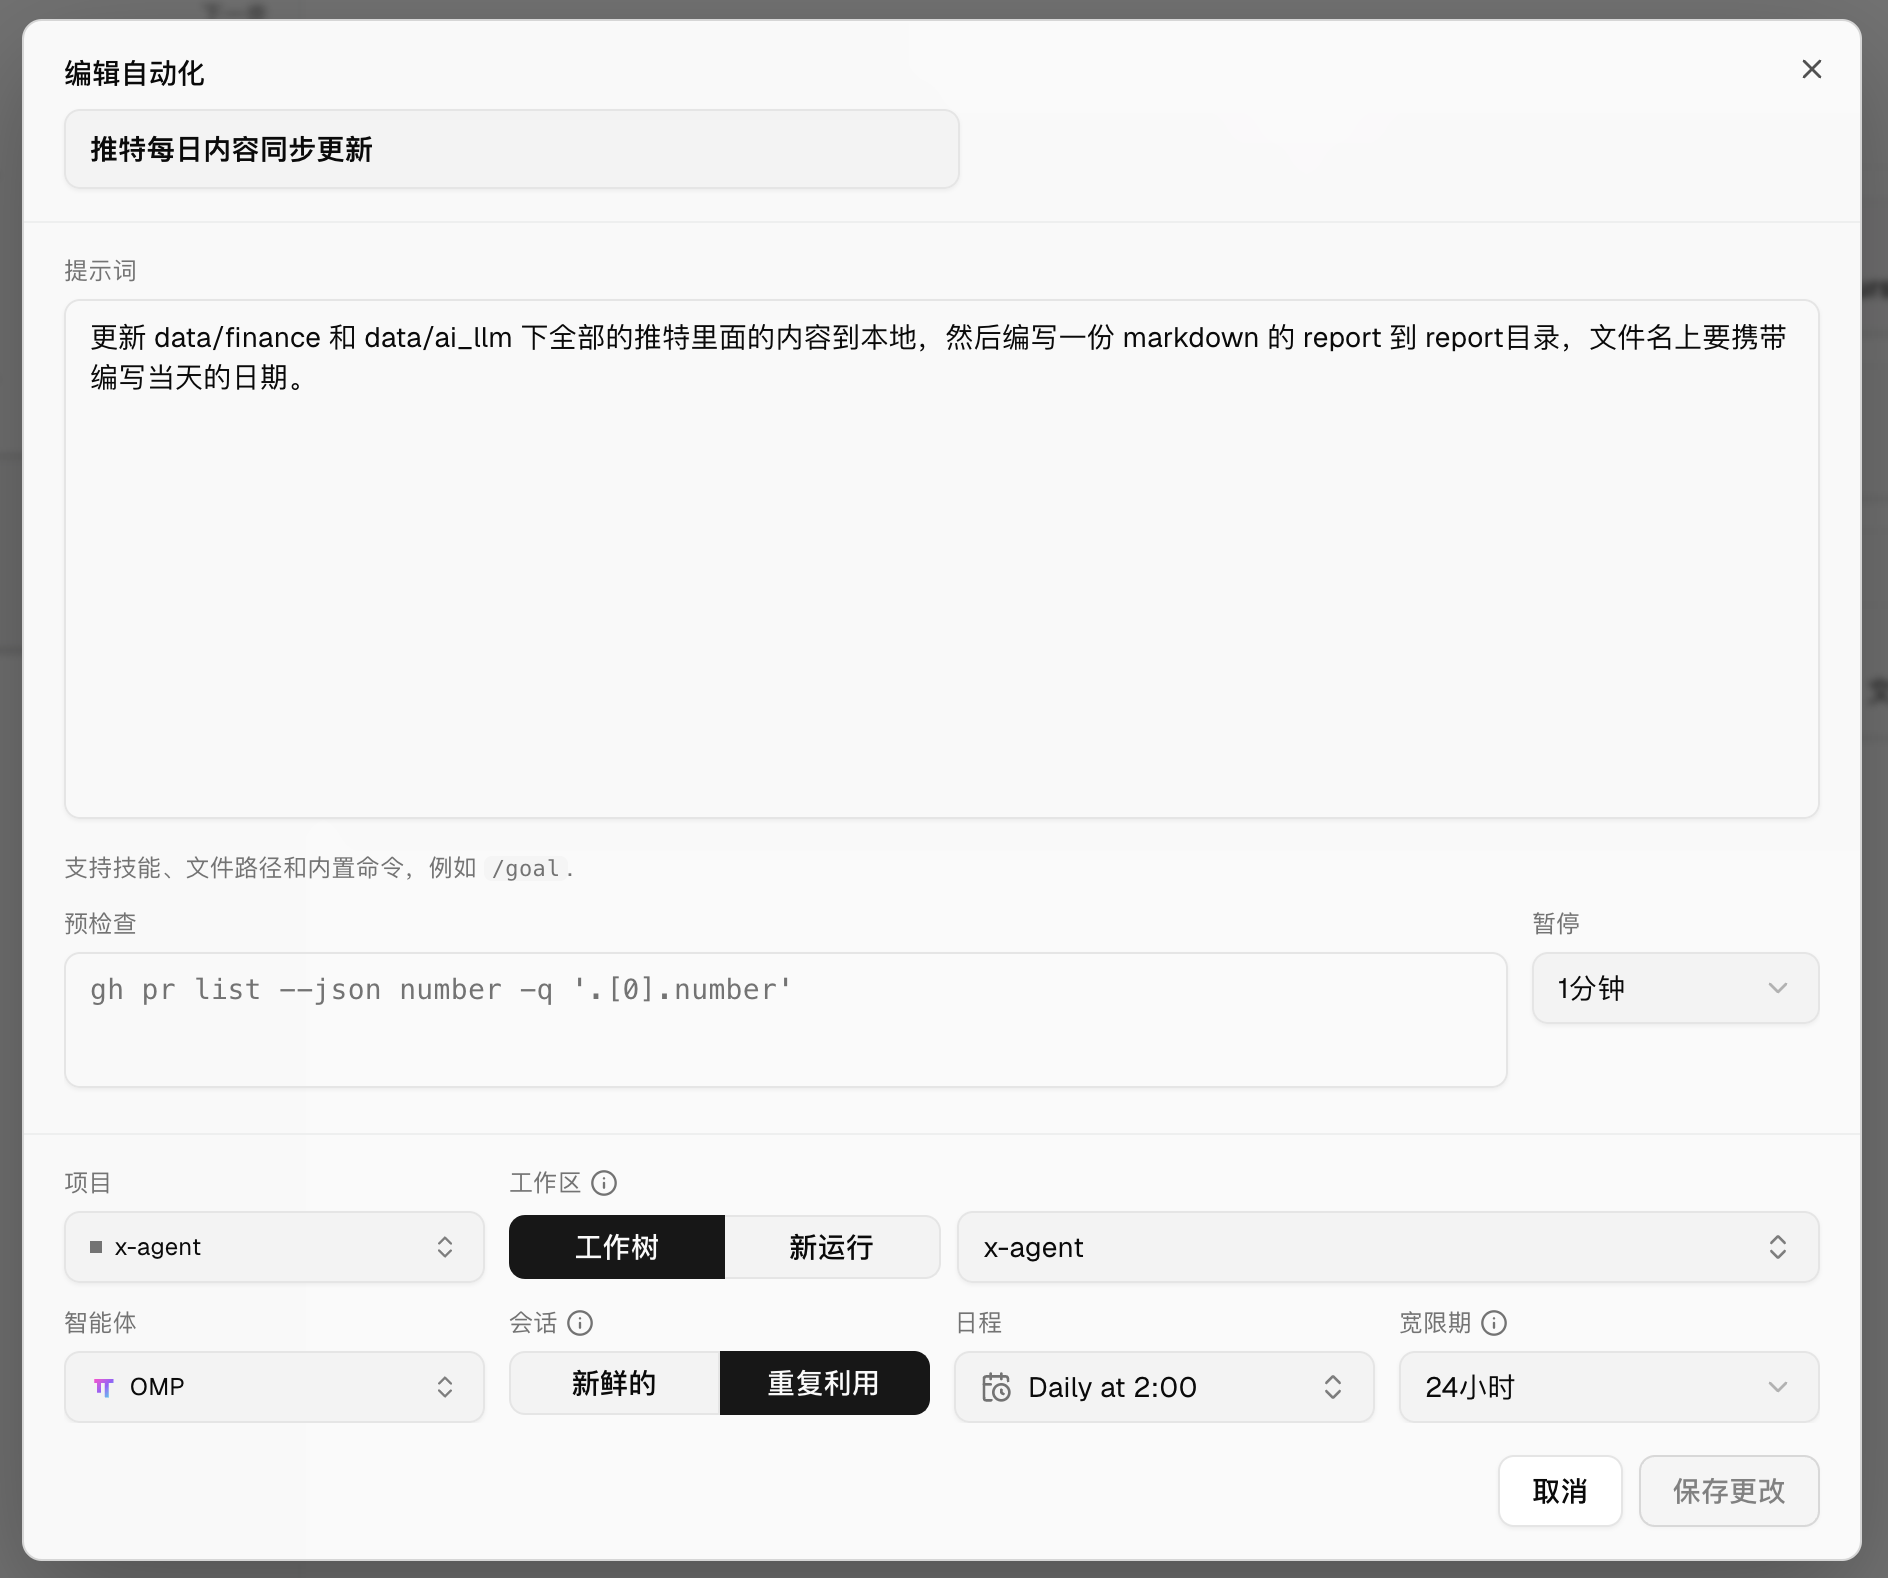
Creating or editing a task puts all configuration in a single dialog:
- Prompt: the task itself. A scheduled task isn't just sending a message on a timer — you can attach an entire ready-made workflow.
- Workspace: pick one of two. "Worktree" runs in an existing worktree (x-agent in the screenshot); "New run" spins up a fresh one each time. Choose the former if you need context accumulation; the latter is cleaner for one-off tasks.
- Session: fresh / reuse. "Reuse" runs multiple executions in the same session (shown as Reuse live session on the detail page) so context carries over; if the previous terminal is gone, it automatically falls back to a new session.
- Agent: the Agent executing the task — OMP in the screenshot.
- Schedule: presets like Daily and Weekdays are available. For more complex schedules, use the Orca CLI's
orca automations create, which supports cron expressions and RRULE.
After configuring, we recommend clicking "Run now" once to verify manually before letting the schedule take over.
Wrapping Up
This combo solves our core pain points:
- Tailscale connects phones and home computers, making "anywhere, anytime" possible.
- Orca pulls scattered Agents into one panel — remote control from your phone, batch management across projects, and scheduled automation, all covered.
For anyone who uses Agents heavily, these two tools together cover the full loop of keeping Agents working while you're away from the computer.